How to Seal a Concrete Driveway Like a Pro?
How to Seal a Concrete Driveway: A Complete Guide for Long-Lasting Protection
Sealing a concrete driveway isn’t just an optional upgrade as it’s a smart investment in your home’s curb appeal and structural integrity. Knowing how to properly seal a concrete driveway can help you avoid damage from water, chemicals, stains, and harsh weather conditions, regardless of how long it has been there.
We’ll take you step-by-step through the entire process in this guide, from comprehending the importance of sealing to expertly applying the appropriate sealant.
Why Sealing a Concrete Driveway Matters
Concrete may look tough, but it’s surprisingly porous. That means water, oil, de-icing salts, and even sunlight can slowly degrade its surface. Concrete driveway surfaces can be sealed to increase longevity, improve appearance, and require less maintenance.
When You Need More Than 4 Inches
Every driveway is not the same, and that 4-inch rule doesn’t work for everyone. If you plan to park heavier vehicles like RVs, trailers, or commercial vans, you’ll likely need something more robust. In these cases, bumping up to 5 or even 6 inches of concrete can make a big difference in how well your driveway holds up over time.
Every driveway is not the same, and that 4-inch rule doesn’t work for everyone. If you plan to park heavier vehicles like RVs, trailers, or commercial vans, you’ll likely need something more robust. In these cases, bumping up to 5 or even 6 inches of concrete can make a big difference in how well your driveway holds up over time.
- Prevents water absorption that causes cracking in cold climates
- Blocks stains from oil and tire marks
- Reduces dust and surface wear
- Protects against UV damage, especially for exposed driveways
- Enhances color and finish on stamped or stained concrete
The protection that sealers offer is priceless, whether you’re maintaining a sealed concrete driveway or patio.
Understanding Different Types of Concrete Sealers
Choosing the right sealer is just as important as applying it properly. Not all sealers are created equal, and your choice should match the conditions and usage of your driveway.
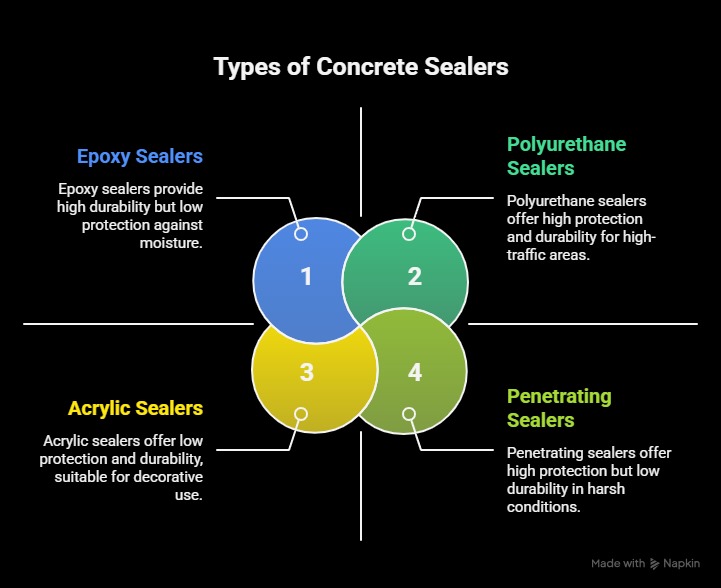
1. Penetrating Sealers
These sealers absorb into the concrete, forming a chemical barrier that protects against moisture and deicing salts. They’re ideal for driveways exposed to harsh weather conditions.
2. Acrylic Sealers
Acrylic sealers form a thin film on the surface, providing good protection against water and UV rays. They’re available in both solvent and water-based formulas and can enhance the appearance of decorative concrete.
3. Polyurethane Sealers
Polyurethane sealers provide a glossy, long-lasting finish that is impervious to chemicals and abrasion. They’re suitable for high-traffic areas but may require professional application.
4. Epoxy Sealers
Epoxy sealers provide a hard, long-lasting finish that’s resistant to chemicals and stains. However, they can be slippery when wet and are best used in areas with minimal moisture exposure.
When and How Often Should You Seal a Driveway?
- New driveways: Wait at least 28 days after pouring concrete before sealing.
- Existing driveways: Reseal every 2 to 3 years or when water no longer beads on the surface.
Ignoring this schedule can cause issues like surface pitting or spalling, especially in colder climates.
Step-by-Step: How to Seal a Concrete Driveway Like a Pro
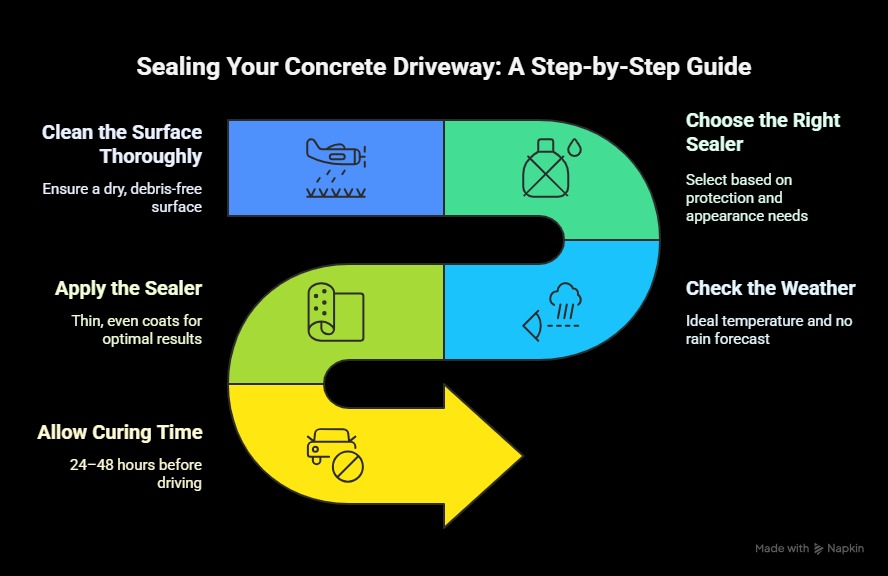
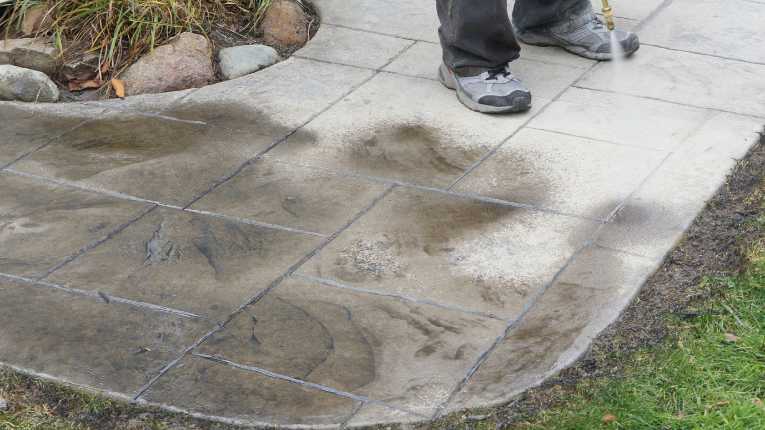
Step 1: Clean the Surface Thoroughly
Before applying any sealant for concrete, the surface must be dry and free of:
- Dirt, debris, and stains
- Oil and grease
- Old sealers (if applicable)
Use a pressure washer or concrete cleaner and degreaser for best results.
Step 2: Choose the Right Sealer
This depends on your goal:
- Want invisible protection? Go for a penetrating sealer.
- Looking to enhance appearance? Use a glossy acrylic concrete seal.
- Need industrial-level strength? Consider epoxy (for garages or commercial settings).
Step 3: Check the Weather
Ideal sealing temperature: 50–90°F. Avoid rain 24 hours before and after sealing.
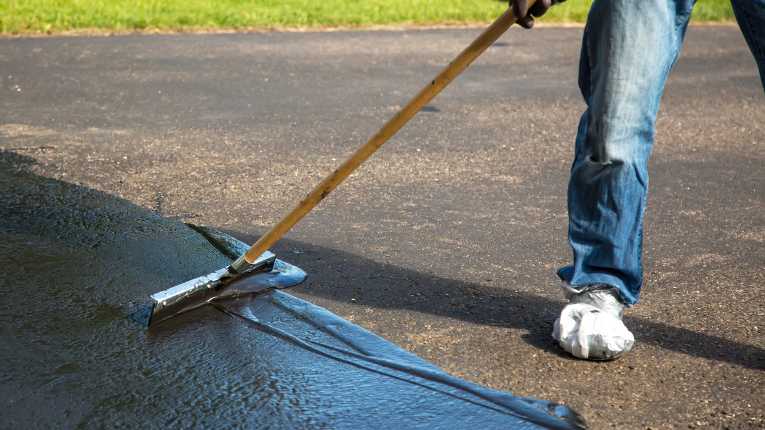
Step 4: Apply the Sealer
- Use a roller, sprayer, or squeegee depending on product type
- Apply in thin, even coats usually one to two is sufficient
- Allow 24–48 hours of curing time before driving on it
Mistakes to Avoid When Sealing Cement Driveway
- Not cleaning thoroughly: Dust or oil will block proper bonding.
- Sealing fresh concrete too soon. This traps moisture and causes cracks.
- Skipping test spots. Always test a small area before full application.
- Using the wrong sealer type. For example, glossy sealers on sloped driveways may cause slipperiness.
DIY vs. Professional: Which Sealing Option Works Best?
When it comes to sealing a concrete driveway, you have two main options: do it yourself or hire a pro. Both have their pros and cons.
If you’re sealing the driveway yourself, you’ll need to pick up a reliable concrete driveway sealer, along with tools like a sprayer or roller. It’s doable for most homeowners and can save you some money. The trade-off is that it takes time, effort, and a bit of know-how.
On the other hand, bringing in a professional gives you peace of mind. Experienced contractors already know what to use to seal concrete, how to apply it properly, and how to avoid common mistakes. This is especially helpful if your driveway is large, decorative, or hasn’t been sealed before.ade-off is that it takes time, effort, and a bit of know-how.
Resealing vs. New Sealing
If your driveway has been sealed before and you’re wondering how to reseal concrete, the process is mostly the same, but:
- You must strip old layers if they’re flaking
- Resealing too often can trap moisture
- Always test for absorption before reapplying
Sealing Fresh Concrete: What You Should Know
Fresh concrete should never be sealed immediately. Wait 28 days or more to allow full curing. Early sealing can cause surface discoloration, flaking, or sealant failure.
Maintaining a Sealed Driveway
Keeping your sealed concrete in good shape doesn’t require much, just:
- Rinsing the driveway regularly
- Removing oil stains promptly
- Reapplying sealer every few years
- Avoiding harsh de-icers in winter
Finishing Up:
Knowing what to use to seal concrete and applying it correctly is a small task that delivers big benefits. A sealed driveway is stronger, longer-lasting, and looks better over time.
If you’ve been putting it off, now’s the perfect time to take action and protect your investment with the right concrete driveway sealer.
Frequently Asked Questions
Acrylic sealers are popular for driveways due to ease of use and protective finish, but penetrating sealers offer better long-term performance.
Yes! With the right tools and preparation, sealing concrete is a straightforward DIY project.
Most sealed surfaces last 2–3 years before needing reapplication, depending on weather and usage.
Absolutely. Sealing helps prevent costly damage and maintains appearance.
Seals protect the surface without altering its appearance; coatings (like epoxy) add a layer and change the surface's texture.